Silhouette 4.0
Introduction to Silhouette Studio Version 4.0
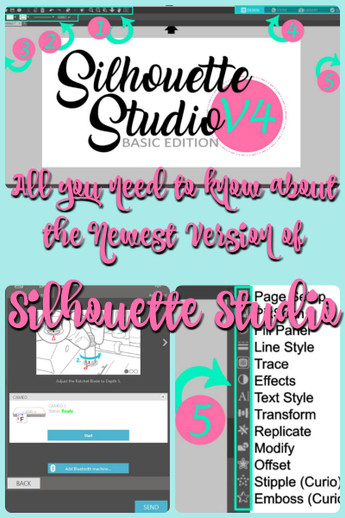
Hi, guys, it's Starla with expressionsvinyl.com. And today I'm going to show you the new layout and the new look and feel of the Silhouette Studio Version Four or V4.
So, when you first open it up, it is going to have a little bit of a different layout. If you are a little nervous about this update, don’t be, this is where I will be going through and helping you locate the new “icon homes” then it is all up to you, so let’s get started…
All your Document Tools are in the same location, but there a new feature, from Left to Right these options consist of:
- New Drawing
- Open
- Save
- Cut
- Copy
- Paste
- Undo
- Redo
- *Select All
- *Deselect All
- *Select by Color
- Zoom In
- Zoom Out
- Drag over Shape to Zoom
- Zoom in and out using mouse
- Pan using mouse
- Fit to Window
These features are the same as in the old version, except the Pink highlighted: Select All, Deselect All, and Select by color. These make it much easier to select your project(s).
Second:
We have the Quick Access Tool Bar or Dynamic Toolbar is a new feature to Version 4.
This new feature located along the top of the Holding area/ Design workspace, now provides short cuts to quickly adjust your; fill color, line color, line style and thickness. Font style can also be located here if text has been selected, like shown below
***The text MUST be selected for this to be activated.
Third:
You may notice that the icons on the left-hand side, your Drawing Tools, have slimmed down, but they have been compiled for into easy access categories.
Select
Edit Points (Features found in the Quick Access Bar)
Delete, Break Path, Corner, Smooth, Make Flat & Make Curve
Drawing Lines
Line, Polygon, Curved Shape, Draw and Arc
Shapes
Rectangle, Round Rectangle, Ellipse & Polygon
Freehand Tools
Regular & Smooth
Text (Features found in the Quick Access Bar)
Knife Tool (Features found in the Quick Access Bar)
These options were in the old version and they're all still here.
If you cannot locate and icon you used before, just keep in mind it is in one of these options.
***Some of the features that are in the quick access bar will only show up once the icon has been selected.
Fourth:
We are now onto the Navigation Tabs:
This includes:
Design (Your work area)
Store (Where you can shop from thousands of images anytime. *internet is required for this portion)
Library (Saved designs to your cloud and downloaded files from the store will be found here)
Send (When you are ready to cut, you can set your cut settings and material)
The first three options before were found on the bottom left hand corner of your Silhouette Studio Program.
The newest portion of this layout is the revamped SEND TO SILHOUETTE
Once again this is a little different but all that was there before is still accessible, just up in the right.
When you first send your image to the cut SEND tab, you will notice a completely different layout.
You will first need to select the MATERIAL, you wish to cut. Any Silhouette products will be pre-programmed and ready to go for you.
However, you can still program your own custom settings by selecting the ADD NEW MATERIAL TYPE. This is feature has improved to be more noticeable for those who find that perfect cut setting for their material(s). You will name your material, your cut type and they manually set your blade, thickness and speed, then simply save.
The next icon is the ACTION. This is where you will tell your machine which tool you wish to use.
NOTE: Only the Cameo 3 and Curio machines will have the options for multiple tools.
If you opt to use both tools, be sure to select your specific lines to the Red (TOOL 1) or Blue (Tool2)
You will also be able to select which blade you wish to use on your project, as well as what lines (colors) to cut and where.
- NO CUT
- CUT
- CUT EDGE
You can no longer perforate lines at this point. To do that you will need to change your line style in your Quick Access Bar.
Finally, your SEND.
There is a quick tutorial guide, now in the SEND function, to help you prep for your cut(s)
Below your image that is ready to cut you will see a quick adjust toolbar. You can adjust your blade from here if the saved or recommended cut setting is not quite accurate, or the blade has become dull.
Once you have your cut settings ready and your Test Cut has been performed to your liking (TEST CUT IS HIGHLY RECOMMENDED).
You can how select SEND, and you have completed your first Cut.
QUICK ADJUST TOOLBAR:
Fifth:
Finally, we have the SILHOUETTE STUDIO TOOLS
Just like before, all of the same features that are part of the Silhouette Tools are available now on the right-hand side of the screen, whereas before the tools were all located on the top right-hand side.
There are no new features for this portion in the Basic Version.
They are also compiled into categories like the Drawing Tools.
That covers the layout of the program, the newest features of the Silhouette Studio include:
- Floating panels
- Quick Tutorials
- New Project Start-up
- The Floating Panels are an awesome new feature that allows you to have more than one of the Silhouette Studio Tools open at once, making it much easier to toggle back and forth between two or more tools when creating an project instead of hoping back and forth, which can be quite frustrating. The key to keeping these at float is that you have you have them detached from the default location.
- The Quick Tutorials are also a handy new tool, especially to those who are just starting out with the program. Advanced users can equally find these tools handy. My favorite is the Modify quick tutorial, its great if you cannot quite remember which tool is needed to accomplish the effect you are looking for.
These can be found by going to the HELP feature of the program.
You can then pick and choose from the tutorial options.
NEW Project Start-Up:
The Feature can be found under the FILE menu.
Depending upon the document you select, the program will automatically open the appropriate panels.
That was a quick rundown of the new version of Silhouette Studio. I personally really like the new features and there are many more that are available in the upgraded versions. Let us know what you think!

Recent Posts
-
Hop into Spring with Cute Easter Vinyl Crafts
Do you love our Vinyl? Sign up for Vinyl Club today to get FREE vinyl and save big! …Mar 28th 2024 -
Fixing Wrinkles and Bubbles in Vinyl
How do you get air bubbles out of vinyl? There are a few different ways to ensure a flawless …Mar 26th 2024 -
20 Creative Craft Quotes You Will Love
March 12, 2024 20 Creative Craft Quotes You Will Love You can never have too many craft …Mar 12th 2024


