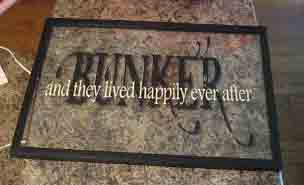
Cricut Vinyl Project - Picture Frame

Cricut vinyl is great for making gifts and decorating. In this project we are going to make a gift that is a decoration. We purchased the picture frame for our project at a local craft store that frequently offers 50% off coupons, so we were able to purchase it for just a few dollars. In this project we are turning the vinyl lettering into the picture. We will layer two different colors of vinyl lettering to make the finished product. In this case we are using a family name for the background, and a cut e saying for the foreground. When complete the picture will be see through, you could add some decorative paper behind the glass to have a solid look.
This particular project was for a wedding gift for some friends. We chose colors and fonts that we felt our friends would like, however you may choose any you like. The background lettering on this project uses black Cricut vinyl and the foreground uses abeige Cricut vinyl. A word of advice for layered projects, always use contrasting colors. If you use colors to close to each other they will just look like a blob where they overlap, and you will probably not be able to read the lettering.
With your vinyl pieces cut, weeded, and transfer tape on you can begin to work on the placement of your elements. When doing this type of project you can use the picture that came with the frame to assist you in placing your vinyl. To do this remove the picture from the frame, it is already the perfect size. Take your vinyl with the backing still on and place it over the picture as you would like it to look in the picture frame. Start with the background piece and when you have it positioned make marks around two diagonally opposite corners. Then place the foreground piece and make marks for it. Now when you put the picture back in the frame you can see through the glass and see your alignment marks.
Now you are ready to stick down your vinyl. When working with glass your vinyl will stick down real easy, so take care to get things lined up before anything touches the glass. Remove the backing on the background image and line it up with your marks. Stick it down and remove the transfer tape. Then repeat the steps to apply the foreground piece.
Now you have your vinyl attached to the glass, but we don’t want all the stuff behind the glass. Remove everything from the frame. We want to make sure that the glass will not fall out. To do this we will put a small drop of hot glue in each corner and set the glass back in. Don’t use to much glue though or it wills squish out on to the front of the glass. Your frame may have bendable tabs that hold everything in, if you do have these you can bend them over to help make sure the glass doesn’t fall out.
With this step completed your project is now done and ready to display.
