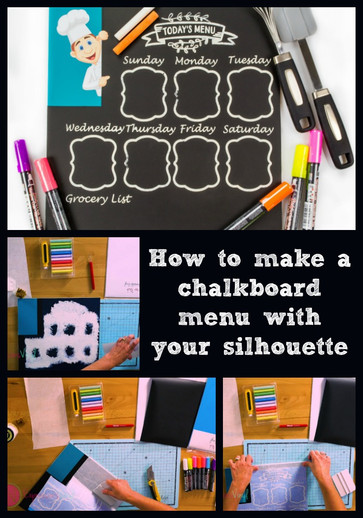
How to Make a Chalkboard Menu with your Silhouette
Hi, I’m Bonnie from Expressionsvinyl.com. Since I am such a beginner to vinyl, I wanted to try out some less familiar products. We are going to be making a fun Chalkboard menu for your kitchen so your family stops asking, “What’s for dinner?” every night. Let’s get started:
Materials needed:
- Oramask 813 (this is a stenciling vinyl)
- Chalkboard Vinyl
- Inkjet Printable Vinyl
- Chalk Paint
- MDF Board
- Chalk or Chalkboard Markers
- Application Tool
- Knife

Step 1 – Apply Chalkboard vinyl to the MDF board
I cut a corner out of the chalkboard vinyl for my chef (optional), but you don’t have to add a picture to your chalkboard. I just thought it was really cute. As you adhere the chalkboard vinyl to your board make sure to work it very slowly so you don’t get bubbles or wrinkles in your vinyl. It’s best to start at the top and line up your board with your vinyl, then work your way down, smoothing it out with the Application Tool as you go.

Step 2 – Add complimentary color in the corner for your picture, if desired.

Step 3 – Adhere Oramask 813 Stenciling Vinyl onto the chalkboard vinyl
After applying transfer paper to the Oramask Stenciling Vinyl you are ready to adhere it to the chalkboard vinyl. One trick to line the stencil up properly is to peel only about one inch of the backing paper off the top and cut that backing paper off. Then you can line up the stencil without the whole piece trying to adhere to your project. Smooth the top part down really good using the Application Tool, then slowly remove the other backing paper from your Oramask Stenciling Vinyl. Watch the centers of your letters or other small pieces to make sure they come off the backing sheet and adhere to your chalkboard.


Step 4 – Remove transfer tape from Oramask Stenciling Vinyl
As you remove the transfer tape, again make sure all small pieces or centers of letters are sticking where they’re supposed to!


Step 5 – Apply chalk paint over all the parts that you want covered.
I chose chalk paint because I wanted a “chalky” look but any desired paint will work.


Step 6 – While paint is drying, add picture to the corner (optional)
I chose to add a chef picture using Inkjet Printable Vinyl, smoothing it down in the corner with the Application Tool. (I know it will require an additional “how-to” video for how to use Inkjet Printable Vinyl, but this is AWESOME vinyl).


Step 7 – After paint is dry, peel off Oramask 813 Stenciling Vinyl
Start in the corner and peel the stenciling vinyl, using the Siser Weeding Tool to remove smaller pieces or centers of letters.


And here you have it! A fun and easy chalkboard menu for your kitchen. Now the hard part is, you still have to plan the menu and cook the meals!!

Recent Posts
-
NEW Holographic Eclipse Heat Transfer Vinyl
April 15th, 2024 3 Ways to Use the New Holographic Eclipse Heat Transfer Vinyl from Siser …Apr 29th 2024 -
Hop into Spring with Cute Easter Vinyl Crafts
Do you love our Vinyl? Sign up for Vinyl Club today to get FREE vinyl and save big! …Mar 28th 2024 -
Fixing Wrinkles and Bubbles in Vinyl
How do you get air bubbles out of vinyl? There are a few different ways to ensure a flawless …Mar 26th 2024


